June 26th, 2014
Render ANY* Android View to an OpenGL Texture
* Recently Android L's View effects will not work for this as they require 100% hardware accelerated canvas drawing.
Important note: Some experience with Android is required for this article! I won't explain how to make an app or a GL context, get a hello-triangle working first!!
This is probably the most under-utilised, most powerful feature of Android and it's a complete crime that it is so poorly documented, so after a few days of stress trying to get this working myself I am going to write up a tutorial right here.
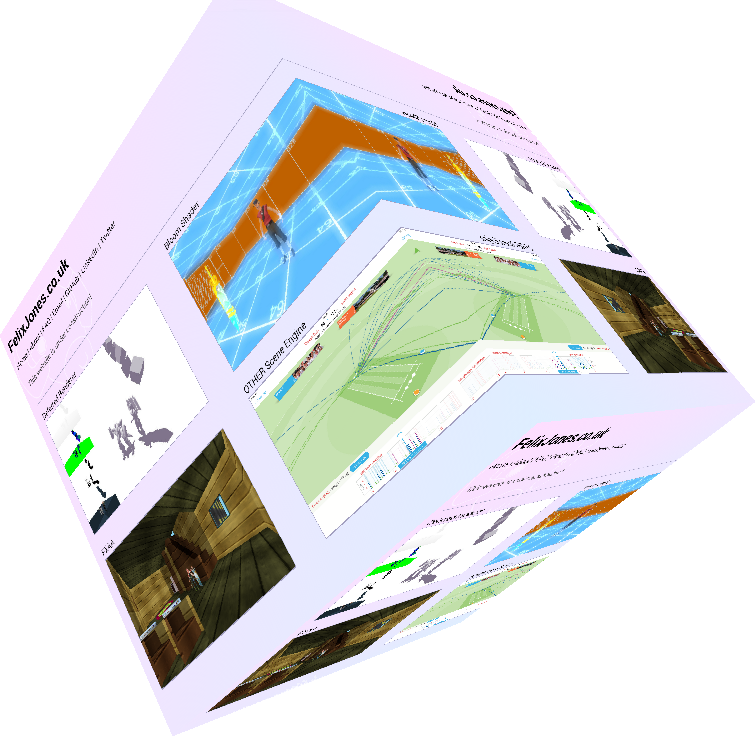
Here is an Android WebView (Not visible) displaying my website being rendered to an OpenGL texture applied to a spinning cube. This is not a static image, it is a live view of the webpage that is updated and re-rendered at excellent speed and performance - none of that "Draw to bitmap, bitmap to texture" rubbish that people tend to use.
The first search result for this problem comes up with a Stack Overflow entry that leads us to believe that this is an impossible feature of Android and will have terrible performance. Well this following article should explain to you how to achieve this feature and with excellent performance for small views (Larger views will slow down due to the software rendering of the Surface's canvas).
Requirements
This requires at minimum Android API level 15, which is part of Android Ice Cream Sandwich 4.0.3 (The 3rd update for Android ICS).
You all need an OpenGL ES context for drawing on.
WebView
Here's my custom WebView class, which is implemented inside the activity in my quick test application.
| 1. | // Fixed values |
| 2. | private final int TEXTURE_WIDTH = ( 720 ); |
| 3. | private final int TEXTURE_HEIGHT = ( 720 ); |
| 4. | |
| 5. | // Variables |
| 6. | private Surface surface = null; |
| 7. | |
| 8. | class CustomWebView extends WebView { |
| 9. | public CustomWebView( Context context ) { |
| 10. | super( context ); // Call WebView's constructor |
| 11. | |
| 12. | setWebChromeClient( new WebChromeClient(){} ); |
| 13. | setWebViewClient( new WebViewClient() ); |
| 14. | |
| 15. | setLayoutParams( new ViewGroup.LayoutParams( TEXTURE_WIDTH, TEXTURE_HEIGHT ) ); |
| 16. | } |
| 17. | |
| 18. | @Override |
| 19. | protected void onDraw( Canvas canvas ) { |
| 20. | if ( surface != null ) { |
| 21. | // Requires a try/catch for .lockCanvas( null ) |
| 22. | try { |
| 23. | final Canvas surfaceCanvas = surface.lockCanvas( null ); // Android canvas from surface |
| 24. | super.onDraw( surfaceCanvas ); // Call the WebView onDraw targetting the canvas |
| 25. | surface.unlockCanvasAndPost( surfaceCanvas ); // We're done with the canvas! |
| 26. | } catch ( OutOfResourcesException excp ) { |
| 27. | excp.printStackTrace(); |
| 28. | } |
| 29. | } |
| 30. | // super.onDraw( canvas ); // <- Uncomment this if you want to show the original view |
| 31. | } |
| 32. | } |
This shouldn't look scary if you know what you're looking at, if it looks scary then, uh, things will get a lot worse for you.
GLSurfaceView.Renderer
First of all, inside the following code is a call to Engine_CreateSurfaceTexture(int,int) (Line 17), this is where the texture creation is done for our view (WebView in this case) to render to, I did this in JNI with C but you can translate it to Android GLES20 Java.
| 1. | class CustomRenderer implements GLSurfaceView.Renderer { |
| 2. | private SurfaceTexture surfaceTexture = null; |
| 3. | |
| 4. | @Override |
| 5. | public void onDrawFrame( GL10 gl ) { |
| 6. | synchronized ( this ) { |
| 7. | surfaceTexture.updateTexImage(); // Update texture |
| 8. | } |
| 9. | // GL Draw code onwards |
| 10. | } |
| 11. | |
| 12. | @Override |
| 13. | public void onSurfaceChanged( GL10 gl, int width, int height ) { |
| 14. | surface = null; |
| 15. | surfaceTexture = null; |
| 16. | |
| 17. | glSurfaceTex = Engine_CreateSurfaceTexture( TEXTURE_WIDTH, TEXTURE_HEIGHT ); |
| 18. | if ( glSurfaceTex > 0 ) { |
| 19. | surfaceTexture = new SurfaceTexture( glSurfaceTex ); |
| 20. | surfaceTexture.setDefaultBufferSize( TEXTURE_WIDTH, TEXTURE_HEIGHT ); |
| 21. | surface = new Surface( surfaceTexture ); |
| 22. | } |
| 23. | |
| 24. | // GL surface change stuff (viewport, etc) |
| 25. | } |
| 26. | |
| 27. | @Override |
| 28. | public void onSurfaceCreated( GL10 gl, EGLConfig config ) { |
| 29. | final String extensions = GLES20.glGetString( GLES20.GL_EXTENSIONS ); |
| 30. | Log.d( "GLES20Ext", extensions ); |
| 31. | |
| 32. | // GL startup code |
| 33. | } |
| 34. | } |
Line 7 is an important call, this block is synchronised with the other threads, it's the point of communication where the WebView's rendering thread and our GL context's rendering thread meet. The .updateTexImage() call will grab the WebView's canvas and slap it onto our GL texture (Well, not exactly, but you can think of it that way).
On line 20 is a call to .setDefaultBufferSize(int,int), this is important as it defined how large the texture you have created is, think of it as the viewport for the render-target.
Engine_CreateSurfaceTexture
This is that method I described earlier, in my application this calls some JNI C, so the following code is a C version of what is happening.
| 1. | int Engine_CreateSurfaceTexture( const int width, const int height ) { |
| 2. | int glTexture; |
| 3. | |
| 4. | glGenTextures( 1, &glTexture ); |
| 5. | if ( glTexture > 0 ) { |
| 6. | glBindTexture( GL_TEXTURE_EXTERNAL_OES, glTexture ); |
| 7. | |
| 8. | // Notice the use of GL_TEXTURE_2D for texture creation |
| 9. | glTexImage2D( GL_TEXTURE_2D, 0, GL_RGB, width, height, 0, GL_RGB, GL_UNSIGNED_BYTE, 0 ); |
| 10. | |
| 11. | glTexParameteri( GL_TEXTURE_EXTERNAL_OES, GL_TEXTURE_WRAP_S, GL_CLAMP_TO_EDGE ); |
| 12. | glTexParameteri( GL_TEXTURE_EXTERNAL_OES, GL_TEXTURE_WRAP_T, GL_CLAMP_TO_EDGE ); |
| 13. | |
| 14. | glTexParameteri( GL_TEXTURE_EXTERNAL_OES, GL_TEXTURE_MIN_FILTER, GL_NEAREST ); |
| 15. | glTexParameteri( GL_TEXTURE_EXTERNAL_OES, GL_TEXTURE_MAG_FILTER, GL_NEAREST ); |
| 16. | |
| 17. | glBindTexture( GL_TEXTURE_EXTERNAL_OES, 0 ); |
| 18. | } |
| 19. | |
| 20. | return glTexture; |
| 21. | } |
The key part of this is the use of GL_TEXTURE_EXTERNAL_OES where you would typically use GL_TEXTURE_2D; it is massively important that you use GL_TEXTURE_EXTERNAL_OES and not GL_TEXTURE_2D with any calls to this texture as the handles generated are totally different aswell as their sources!
An explanation: The external texture extension makes it so there is a semi-global texture table on the GPU, so you can use the texture handle generated with this on other GL contexts and threads, which is pretty magical (If you can guarantee the threads communicate safely).
The following are some example calls with the GL_TEXTURE_2D and the GL_TEXTURE_EXTERNAL_OES, after each texture is generated I show what the texture handle (AKA texture name) is, you will see that external textures may have the same name as internal (Regular) textures depending on the order of creation.
| 1. | int glTexture; |
| 2. | |
| 3. | // GL_TEXTURE_2D |
| 4. | glGenTextures( 1, &glTexture ); |
| 5. | glBindTexture( GL_TEXTURE_2D, glTexture ); |
| 6. | glTexImage2D( GL_TEXTURE_2D, 0, GL_RGBA, WIDTH, HEIGHT, 0, GL_RGBA, GL_UNSIGNED_BYTE, 0 ); |
| 7. | // glTexture => 1 |
| 8. | |
| 9. | // GL_TEXTURE_EXTERNAL_OES |
| 10. | glGenTextures( 1, &glTexture ); |
| 11. | glBindTexture( GL_TEXTURE_EXTERNAL_OES, glTexture ); |
| 12. | glTexImage2D( GL_TEXTURE_EXTERNAL_OES, 0, GL_RGBA, WIDTH, HEIGHT, 0, GL_RGBA, GL_UNSIGNED_BYTE, 0 ); |
| 13. | // glTexture => 2 |
| 14. | |
| 15. | // GL_TEXTURE_2D |
| 16. | glGenTextures( 1, &glTexture ); |
| 17. | glBindTexture( GL_TEXTURE_2D, glTexture ); |
| 18. | glTexImage2D( GL_TEXTURE_2D, 0, GL_RGBA, WIDTH, HEIGHT, 0, GL_RGBA, GL_UNSIGNED_BYTE, 0 ); |
| 19. | // glTexture => 2 <-- LOOK AT THIS, the next GL_TEXTURE_2D has the same handle as the external texture! |
| 20. | |
| 21. | // GL_TEXTURE_2D |
| 22. | glGenTextures( 1, &glTexture ); |
| 23. | glBindTexture( GL_TEXTURE_2D, glTexture ); |
| 24. | glTexImage2D( GL_TEXTURE_2D, 0, GL_RGBA, WIDTH, HEIGHT, 0, GL_RGBA, GL_UNSIGNED_BYTE, 0 ); |
| 25. | // glTexture => 3 |
| 26. | |
| 27. | // GL_TEXTURE_EXTERNAL_OES |
| 28. | glGenTextures( 1, &glTexture ); |
| 29. | glBindTexture( GL_TEXTURE_EXTERNAL_OES, glTexture ); |
| 30. | glTexImage2D( GL_TEXTURE_EXTERNAL_OES, 0, GL_RGBA, WIDTH, HEIGHT, 0, GL_RGBA, GL_UNSIGNED_BYTE, 0 ); |
| 31. | // glTexture => 4 |
| 32. | |
| 33. | // GL_TEXTURE_2D |
| 34. | glGenTextures( 1, &glTexture ); |
| 35. | glBindTexture( GL_TEXTURE_2D, glTexture ); |
| 36. | glTexImage2D( GL_TEXTURE_2D, 0, GL_RGBA, WIDTH, HEIGHT, 0, GL_RGBA, GL_UNSIGNED_BYTE, 0 ); |
| 37. | // glTexture => 4 <-- It happened AGAIN! |
So with that gotcha out of the way, the last thing to do is make a GLES2 shader that will draw our external texture (Which is now our custom WebView).
Fragment Shader
Presuming you already have a cube/plane/triangle/whatever rendering, here is the fragment shader for drawing our view (Remember to also make a vertex shader, nothing special happens here so you can just re-use your current vertex shader).
| 1. | #extension GL_OES_EGL_image_external : require |
| 2. | // ^- Important, this says to the GPU's shader compiler that we are using that external texture extension |
| 3. | |
| 4. | // precision lowp float; // Your precision, I use lowp, it's up to you obviously |
| 5. | |
| 6. | varying vec2 glFragment_uv; // Texture UV sent from vertex shader |
| 7. | |
| 8. | uniform samplerExternalOES uniform_texture0; // Our WebView's texture! Note that it is NOT (And can't be) sampler2D |
| 9. | |
| 10. | void main() { |
| 11. | gl_FragColor = texture2D( uniform_texture0, glFragment_uv ); |
| 12. | } |
The key part here is the use of the external texture extension, this is a requirement, it MUST be done so samplerExternalOES can be used (Which accesses that texture names that is shared with the Android view rendering thread).
Implementation
Simply make an instance of your custom WebView and set it's URL on the activity creation stage and then attach it to the view hierarchy.
| 1. | @Override |
| 2. | protected void onCreate( Bundle savedInstanceState ) { |
| 3. | super.onCreate( savedInstanceState ); |
| 4. | |
| 5. | // Make our views (Including our WebView) |
| 6. | GLSurfaceView glSurfaceView = new GLSurfaceView( this ); |
| 7. | CustomWebView myWebView = new CustomWebView( this ); |
| 8. | |
| 9. | // Load our webpage |
| 10. | myWebView.loadUrl( "http://www.felixjones.co.uk/" ); |
| 11. | |
| 12. | // Make custom renderer |
| 13. | CustomRenderer renderer = new CustomRenderer(); |
| 14. | |
| 15. | // Setup the surface view for drawing to |
| 16. | glSurfaceView.setEGLContextClientVersion( 2 ); |
| 17. | glSurfaceView.setRenderer( renderer ); |
| 18. | |
| 19. | // Set the activity to display the glSurfaceView |
| 20. | setContentView( glSurfaceView ); |
| 21. | |
| 22. | // Add our WebView to the Android View hierarchy |
| 23. | addContentView( myWebView, new ViewGroup.LayoutParams( TEXTURE_WIDTH, TEXTURE_HEIGHT ) ); |
| 24. | } |
My application looks like this:
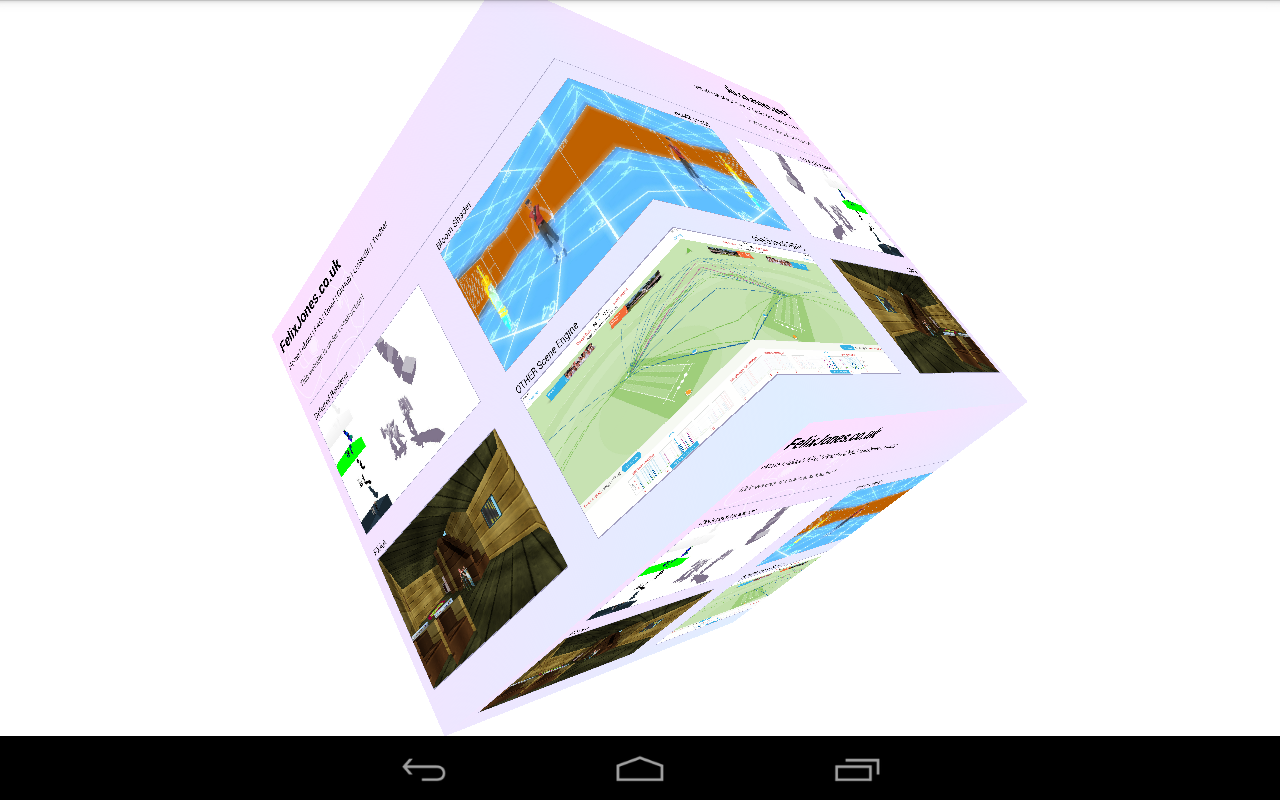
This can be applied to ANY Android view, it is massively powerful and performs very well.
I hope this documents the feature a bit better! It seems to be in that area of Android where no-one is willing to help any developers who are lost in the darkness. Use the comment section to ask any questions.